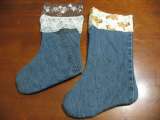
We’ve found a great way to reuse the kids’ clothing, DIY Stockings. Have the kids help you go through their ripped and stained clothing to design the look of your stockings. Then have them help you search for embellishment options. Odd fabric scraps, buttons, beads, patches, lace, ribbon, and appliqués made from other clothing all work beautifully as decoration.
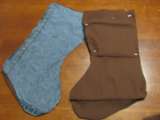
These stockings were made using one pair of holey jeans (size 7 kids), a couple of toddler t-shirt fronts, a brown sheet and some old lace. I’m working on one made with an Asian Silk Kimono Robe. Delicate fabrics (such as the silk from the robe) may require special handling. I use pinking shears to cut and am lining the front and back of the stocking with white fabric from an old bed skirt (the eyelet part of the skirt will become new petticoats for under my daughter’s dresses).
You can make a pattern simply by tracing an existing stocking, free hand your stocking shape (who says it must be the standard shape) or download a free one online such as the one I used from About Sewing.
In addition to fabric and embellishments, you will also need some thread, scissors and a few pins. My choice of tools is a sewing machine, but these can be sewn by hand as well.
Step One- Find and Prepare your pattern and fabrics (cut legs off jeans and open at seam, etc…). Use a copy machine if you need to enlarge or shrink your pattern. Cut the pattern out.
Step Two- Pin the pattern pieces to your fabric (This required a little creative maneuvering to avoid the knee holes.) Remember you want your two pieces to fit back to back with right sides out, so cut one, then flip the pattern over and cut the second. Or lay your fabric pieces back to back prior to pinning and cutting in order to obtain both sides at once. One pair of kids jeans should make two fronts (using an alternate fabric on the back of the stocking) or one complete (front and back) stocking.
Step Three- Cut out your fabric for stocking body, then cuff. I like to use fun designs for the cuff of the stocking. The designs on a couple toddler t-shirts were the perfect size.
Step Four- Attach your cuff to the front stocking piece. I folded the edges under and used a zig-zag stitch to attach it. For the top piece, I simply folded the cuff pieces over the top of the denim then used a zig zag stitch, this essentially created a hem. Be sure to sew a hem into the top of your front and back pieces prior to sewing pieces together or you will have an unfinished stocking (as I do with the lace trimmed one). If you are attaching lace or ribbons to the base of the cuff as I did in the stocking on the left, this should be sewn on prior to attaching front and back of stockings. I find it easier to attach all embellishment to the front stocking piece PRIOR to stitching stocking together.
Step Five- Pin the stocking pieces together INSIDE out. Your trim pieces should also be inside the seam so you have nicely finished edges. (If you want to attach a hanger loop, use a piece of ribbon to form a loop and pin it into the layers. Stitch across bottom of loop to secure, then sew into seam of stocking.) For a seam allowance, I kept my fabric at the edge of the feeder foot on the machine. You can adjust this based on how much you want to alter the stockings size. Leave the top OPEN, I started my stitch (go back and forth a couple times to secure start and end stitch) on the right side of the stocking, then down around the toe, bottom, heel and up the left side.
Step Six- Remove the pins and turn stockings right side out. Double check for any open seams. If you find any missed sections, turn the stocking inside out again and hand or machine stitch over the missed area. Press your stockings. If you like the look, you can use a straight, zig-zag or hand stitch to decorate the edge of the stocking. Be sure to leave the top open.
These will make wonderful stockings to hang up for Santa Christmas morning or to use as a gift. I’ve decided they will make great wrapping for Organic Wine.
Other Posts You Might Like:


[…] Upcycled Handmade Stockings […]